- May 3
Iron Condor Strategy: What Works and What Most Traders Get Wrong
- Pedro Branco
- Iron Condor
- 0 comments
Iron condors look simple until the market moves. A working trader's breakdown of what actually works: entry timing, strike selection, adjustment triggers, and when to walk away.
Iron Condor Strategy – Summary
Trade in range-bound markets
Open in a high volatility environment
Select high probability strikes
Manage risk with defined spreads
Close early when reaching below 50% of max profit
What 15 Years of Trading Iron Condors Actually Taught Me
I want to be upfront about something before we get into the mechanics.
I've traded iron condors extensively — on SPX, on SPY, on individual ETFs. I understand the strategy deeply. And over time, my approach has evolved away from the standard iron condor toward a modified structure I find significantly more manageable: the broken wing butterfly or also an unbalanced Iron Condor.
That's not a reason to dismiss iron condors. The core thesis — sell premium on both sides, profit from time decay and range-bound price action — is sound and repeatable. But there are specific ways most traders apply iron condors that consistently lead to losses, and specific ways to apply them that produce consistent income.
This article covers both. The mechanics are below. But I also want to share what I've observed from trading these structures in a real investment fund since 2020, because the textbook version of iron condors leaves out a lot of the things that actually matter.
Understanding the Iron Condor Strategy
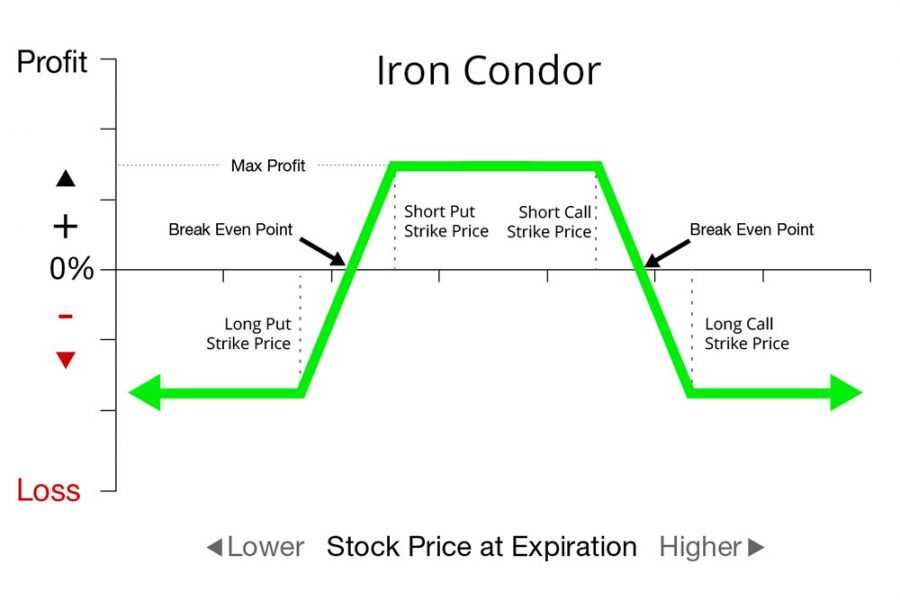
The iron condor is a non-directional, short volatility options trading strategy that has a limited risk and limited profit potential. It gets its name from the shape of its payoff diagram, which resembles a condor with wide wings. This strategy involves four options with four different strikes, all sharing the same expiration date.
What is an Iron Condor?
An iron condor is constructed by selling an out-of-the-money (OTM) put spread and an OTM call spread simultaneously. The order of strikes from lowest to highest is: long put, short put, short call, long call. The goal is to profit from the underlying asset trading within a specific range through the expiration of the options contracts.
Components of an Iron Condor
Long Put: The strike price of the long put is the lowest among all the legs.
Short Put: The short put has a strike price higher than the long put.
Short Call: The short call has a strike price higher than the short put.
Long Call: The strike price of the long call is the highest among all the legs.
It's crucial to ensure that both wings (the distance between the two put strikes and the two call strikes) have the same width when entering an iron condor trade. This makes the position non-directional with equal risk on both sides.
Risk and Reward Profile
The maximum profit from an iron condor trade equals the net premium received, which applies when the underlying price settles between the inner (short) strikes at expiration. The strategy benefits from the passage of time and any decreases in implied volatility.
However, the maximum loss is capped at the difference between the bought and sold call strikes or the bought and sold put strikes, less the net premium received. This loss occurs if the underlying asset moves significantly in either direction, above the highest strike or below the lowest strike.
The risk-reward ratio of an iron condor depends on the specific strikes and premiums involved as well as the Implied Volatility level of the underlying. Traders must carefully consider the potential profit and loss before implementing this strategy.
Iron Condor Strategy Success Rate
The success rate of an Iron Condor strategy depends on several factors, including the trader's skill in selecting strike prices, market conditions, volatility, and time to expiration. While there isn't a fixed or universally applicable success rate, here are some important aspects to consider:
High Probability of Success:
Iron Condors are often constructed to have a high probability of success, as they involve selling out-of-the-money (OTM) options, which have a lower chance of expiring in the money. When selecting the Delta of sold options the Iron Condor can have a probability of success of around 65-85%.Limited Profit Potential:
Despite a higher probability of success, the potential profit from an Iron Condor is limited because you are collecting a fixed premium. In contrast, the potential losses can be higher if the underlying asset moves significantly outside the range of your short strikes. The higher the potential loss whenever you select an higher probability of success (price to sit at expiration between the short strikes.Market Conditions:
Iron Condors tend to perform best in neutral or range-bound markets with low to moderate volatility. In highly volatile markets, the price of the underlying can move outside the range of your strikes, leading to losses.Risk Management:
Successful Iron Condor trading depends heavily on good risk management. Closing the trade early if the price moves too close to one of the strike prices, adjusting the position, or hedging can improve the strategy's success rate over time.Typical Performance:
In a well-executed Iron Condor strategy, many traders aim for about a 70-80% success rate, but they may face higher potential losses on losing trades. For example, you may win 7 out of 10 trades with small profits, but the 3 losing trades could potentially wipe out the cumulative gains if not managed properly.
The key to long-term success with Iron Condors is balancing the probability of winning with risk management to minimize significant losses when the market moves against the trade.
What I've Learned From Trading Iron Condors in My Account
The success rate numbers I described above (65-85% probability of profit at entry) are theoretically accurate. In practice, three things consistently separate traders who make money with iron condors from those who don't.
1. DTE selection matters more than strike selection
Most beginners focus intensely on which strikes to sell. In my experience, when you open the trade relative to expiration has an equal or greater impact on outcome.
I've found that 45-60 DTE provides the best balance for iron condors on SPX. You're far enough from expiration that small market moves don't immediately threaten your short strikes, yet close enough that theta is working meaningfully in your favour every day. Short-dated iron condors — 21 DTE or less — are a different game entirely. Gamma risk becomes dominant, and a single bad day can overwhelm weeks of theta collection.
This is one of the reasons I migrated toward broken wing butterflies. The longer DTE gives me far more room to manage adjustments without the urgency that kills short-dated condor positions.
2. Volatility environment at entry determines everything
The iron condor is a short volatility strategy. You are selling options premium — and that premium is priced by implied volatility. When you open a condor in a low-IV environment, you collect thin premium while carrying the same structural risk. When IV is elevated, you collect significantly more premium for the same strikes and the same risk.
My rule: I only open iron condors when IV rank (IVR) is above 30, ideally above 40. If the market has been quiet for weeks and IV is compressed, I wait. The premium isn't there and the risk/reward doesn't justify it.
3. The adjustment decision is where most traders lose discipline
Managing a threatened iron condor is psychologically difficult in a way that the theoretical descriptions don't capture. When your short put is being tested and the market is falling, the urge to "wait and see" is powerful — and usually wrong. By the time it's obvious you need to adjust, the adjustment has become expensive.
My approach: I define my adjustment trigger before I open the trade. If the underlying reaches a specific delta level on the threatened spread, I act — regardless of what I think the market will do next. This removes the emotional component and keeps risk defined.
The key adjustment tools I use:
Rolling the threatened spread further out in time — extends DTE, often collects additional credit
Narrowing the untested spread — brings in more premium to offset losses on the tested side
Converting to a broken wing butterfly — in some cases, restructuring the condor into a BWB is cleaner than repeated rolling
When to Use the Iron Condor Strategy
Setting up an iron condor example trade involves carefully selecting the underlying asset, strike prices, expiration dates, and position size. The goal is to create a position that maximizes the probability of success while limiting risk. We usually trade SPX or SPY Iron Condor.
Choosing the Right Underlying Asset
When setting up an iron condor, it's crucial to choose an underlying asset that is expected to remain range-bound during the life of the trade. Look for assets with stable price action. Indices like the S&P 500 or ETFs tracking major sectors are often good candidates for iron condors.
Selecting Strike Prices and Expiration Dates
The next step is to select the appropriate strike prices and expiration dates for the iron condor. Typically, traders aim to sell the short options with strike prices that are one (or even more) standard deviation away from the current price of the underlying asset. This provides a high probability of the options expiring worthless.
When choosing expiration dates, consider the time frame in which you expect the underlying asset to remain range-bound. Shorter-term expiration dates offer higher potential returns but also carry more risk. Longer-term expiration dates provide more time for the trade to work out but may result in lower returns.
Determining Position Size
Position sizing is a critical aspect of risk management when setting up an iron condor. The maximum loss on an iron condor is limited to the difference between the strike prices of the credit spreads minus the net credit received. Traders should size their positions based on their risk tolerance and account size.
A general rule of thumb is to risk no more than 1-2% of your account on any single trade. This helps to preserve capital and allows for multiple opportunities to profit over time.
By carefully selecting the underlying asset, strike prices, expiration dates, and position size, traders can set up iron condors with a high probability of success while managing risk effectively.
Managing Iron Condor Positions
Once an iron condor trade has been initiated, it's crucial to monitor and manage the position to ensure optimal results actively. This involves keeping a close eye on the underlying asset's price movement and the position's Greeks, particularly delta and theta. Adjusting the Iron Condor will be key to manage all any moment the position risk.
If the underlying asset's price starts to approach one of the short strikes, it may be necessary to adjust the trade to prevent significant losses. One common adjustment technique is to roll the threatened spread further out in time and in the direction of the price movement. For example, if the underlying asset's price is moving higher and threatening the short call spread, the trader could close the current call spread and open a new one with higher strikes in a later expiration.
Another important aspect of managing iron condors is having clear exit strategies in place. Many traders set profit targets and stop-loss levels based on the credit received or the maximum potential loss. It's also common to exit the trade when a certain percentage of the maximum profit has been achieved, such as 50% or 75%.
Rolling techniques are essential tools for managing iron condors. If the underlying asset's price is approaching one of the short strikes, and there is still significant time until expiration, rolling the threatened spread out in time and in the direction of the price movement can help to reduce risk and potentially capture additional premium. It's important to be proactive with rolling and not wait until the position has suffered substantial losses.
Key Elements of a Successful Iron Condor
Several factors contribute to the success of an iron condor strategy. Implied volatility plays a crucial role, as the strategy benefits from a decrease in implied volatility. Traders should aim to initiate iron condors when implied volatility is higher than it is at exit or expiration.
The probability of profit is another key consideration. Selling options with strike prices that are one standard deviation away from the current price of the underlying asset provides a high probability of the options expiring worthless. However, the closer the strike prices are to the underlying price, the more credit will be collected, but the higher the probability the option will finish in the money.
Balancing risk and reward is essential for successful iron condor trading. The risk-reward ratio depends on the specific strikes and premiums involved. Traders must carefully consider the potential profit and loss before implementing this strategy. Position sizing based on risk tolerance and account size helps to preserve capital and allows for multiple opportunities to profit over time.
How Iron Condors Fit Into My Account's Strategy
Iron condors formed a significant part of my early trading approach. As I developed the fund's strategy framework, I refined toward a structure I call the SPX Best — a broken wing butterfly on SPX puts — as my primary income trade.
The reason isn't that iron condors don't work. It's that the broken wing butterfly on SPX solved several specific problems I kept encountering with iron condors:
Undefined edge on the call side. A standard iron condor has defined risk on both sides. But in practice, the call side of an SPX condor often delivers very little premium relative to the risk taken. The market tends to drift upward over time — meaning your call spread is more likely to be tested than a purely statistical analysis suggests. The broken wing butterfly eliminates the call side exposure entirely while keeping the put side structure.
Adjustment flexibility. A broken wing butterfly gives me more adjustment options when the market moves against the position. The asymmetric structure means I have more levers to pull without immediately breaching the maximum loss threshold.
Consistent theta profile. The BWB structure generates positive theta from the moment of entry, with the theta increasing as the trade matures — similar to an iron condor, but typically with a cleaner risk profile relative to the premium collected.
The live results: Since October 2021, the SPX Best strategy has delivered:
83% win rate — 52 wins from 63 trades
Average profit of $1,090 per winning trade
~15% monthly return on capital allocated per position
The fund's overall return of +270% since January 2022 — compared to SPX +43% over the same period — is driven primarily by this strategy and the SPY Ride.
You can verify the complete trade history on the Trading Account page — every position, every month, since we started.
This context matters because the iron condor principles described in this article — implied volatility timing, strike selection discipline, early management of winners, adjustment frameworks — are foundational to the broken wing butterfly as well. Mastering iron condors makes you significantly better at trading every non-directional premium-selling strategy. They're not alternatives. They're steps on the same learning path.
Common Pitfalls and How to Avoid Them
While iron condors can be an effective strategy for generating income, traders must be aware of potential pitfalls that can lead to significant losses. Here are some common mistakes to avoid:
Overtrading
One of the most common mistakes traders make is overtrading, or entering too many positions relative to their account size. This can lead to excessive risk exposure and potential margin calls. To avoid overtrading, traders should adhere to strict position sizing rules and limit their overall exposure to a small percentage of their account.
Ignoring Greek Values
Another pitfall is ignoring the Greek values of the iron condor position, particularly delta and theta. Delta measures the sensitivity of the position to changes in the underlying asset's price, while theta represents the rate of time decay. Failing to monitor these values can result in unexpected losses. Traders should regularly assess their position's Greeks and make adjustments as needed to maintain a neutral delta and maximize theta decay.
Poor Risk Management
Effective risk management is crucial for success with iron condors. Traders should establish clear exit strategies, such as closing the position when a certain percentage of the maximum profit has been achieved or when the underlying asset approaches one of the short strikes. Additionally, setting stop-loss orders can help limit potential losses if the market moves against the position. By implementing sound risk management techniques, traders can protect their capital and minimize the impact of adverse market conditions.
To maximize the probability of success with iron condors, traders must be disciplined, patient, and willing to adapt their strategies as market conditions change. By avoiding these common pitfalls and focusing on sound risk management, traders can effectively harness the power of this versatile options trading strategy.
Optimizing Iron Condor Profits
To maximize profits with iron condors, traders must strike a balance between the credit received and the probability of success. A wider spread between the short and long options will result in more premium collected, but also increases the maximum risk. Conversely, a narrower spread has a higher probability of expiring worthless, but the potential profit is lower.
Traders can optimize their iron condor strategy by managing winners early. If the underlying stock price stays between the short options, the contracts will expire worthless, allowing the trader to keep the full premium. However, there may be opportunities to close the position for a profit before expiration by exiting the full position, exiting one spread, or buying back only the short options.
Adjusting iron condors can also increase profitability. By rolling the unchallenged spread in the direction of the underlying stock's price movement, traders can bring in more credit, which increases the maximum profit potential, decreases the maximum risk, and widens the break-even points. However, this tightens the iron condor's width and decreases the position's range of profitability.
Iron Condor Variations
The Iron Condor strategy can be modified to suit various market conditions and trading preferences. Traders can skew the risk profile, adjust strike prices, and create directional bias. Here are some popular variations of the iron condor:
Broken Wing Butterfly: This variation combines an iron condor with a butterfly spread. It involves selling a put spread and a call spread at different widths, creating a "broken wing" shape. This strategy is often used when implied volatility is high or when the trader has a directional bias.
Unbalanced Iron Condor: In this variation, the trader adjusts the width of the spreads on one side of the trade. For example, selling a USD 1.00 wide put spread and a USD 2.00 wide call spread. This transfers risk from one side to the other, adding a delta component to the strategy.
Iron Condor with a Directional Bias: Traders can create a directional bias by placing the put or call side of the trade closer to at-the-money (ATM) while moving the other side further away from ATM. This allows traders to benefit from a slight directional move while still maintaining the defined risk characteristics of an iron condor.
By understanding these variations, traders can adapt the iron condor strategy to better suit their market outlook and risk tolerance. Skewed iron condors work well in high implied volatility environments and when traders have a moderate directional bias.
Adjusting in Volatile Markets
In volatile markets, adjustments may be necessary to manage risk. For example, if the underlying stock price approaches one of the short strikes, the trader could roll that spread further out in time and in the direction of the price movement. This allows them to collect additional premium and potentially turn a losing trade into a winner.
By studying these case studies, traders can gain valuable insights into the practical application of iron condors and learn how to adapt their strategies to various market conditions.
Conclusion: Iron Condors Work — Here's What to Do Next
The iron condor is one of the most reliable non-directional income strategies in options trading. When applied with proper volatility timing, disciplined strike selection, and defined adjustment triggers, it produces consistent income across a wide range of market conditions.
But I want to be honest about something: after years of trading iron condors in my own fund, I've moved primarily toward the broken wing butterfly on SPX as my core structure. Not because iron condors are flawed — but because the BWB gives me more adjustment flexibility, better risk/reward, and a cleaner theta profile for the specific way I trade.
The iron condor is an excellent place to learn. The discipline of defining your risk before entering, managing winners early, and adjusting positions proactively carries directly into every non-directional strategy you'll ever trade. If you can trade iron condors consistently, you can trade broken wing butterflies. If you can manage a threatened condor without panicking, you can manage a BWB adjustment with confidence.
The principles are the same. The tools get sharper.
For traders who want to see these principles applied in real time — not in a simulation, not on a paper account — the Trading Community is where I post every live position as I open it. Every SPX non-directional trade I place is documented with the entry rationale, the strikes selected, the adjustment decisions, and the final P&L. Members see exactly what I do, exactly when I do it, and exactly why.
The current strategy I'm running — the SPX Best broken wing butterfly — has delivered an 83% win rate across 63 trades since October 2021. Every trade is on the public record.
About the author: Pedro Branco is a volatility-focused index options trader with 15+ years of experience who has run a live investment fund since 2020. Non-directional strategies, including iron condor variants and broken wing butterflies are the foundation of his fund's +270% return since January 2022. He is the author of The Volatility Trading Plan on Amazon.